(Featured Image: Something that resemble lightning speed. Taken by Anders Jildén, xoz, your site above to be super fast)
Intended Users:
If your situation is similar to what describes bellow, then this article is for you.
- You have a domain name, on Route 53 or with other service provider (i.e. NameCheap.com) and your DNS provider is Route 53 (You can do this easily) .
- You want to serve your content on www.example.com and want to use CloudFront CDN
- You have a server (any server with HTTPD or NGINX) and have enough access to change the web servers configuration. I.e. httpd.conf or nginx.conf
- You want to point http://example.com, https://example.com and http://www.example.com to https://www.example.com for SEO reasons
- You don’t intend to serve any dynamic content (through HTTP GET) on your non-www or www if you only following this guide to setup . With minor changes you can serve dynamic content as well.
Note: I am using a demo domain. It may not be up by the time you read this article.
lets get started.
Setting Up Route 53
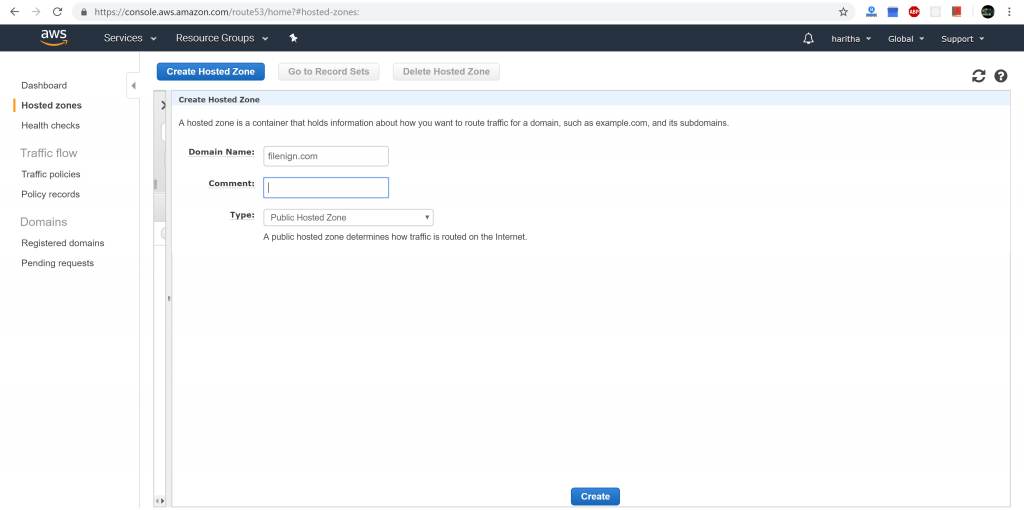
STEP 1. Create a Hosted Zone on Route 53
STEP 2. Enter your Domain name details
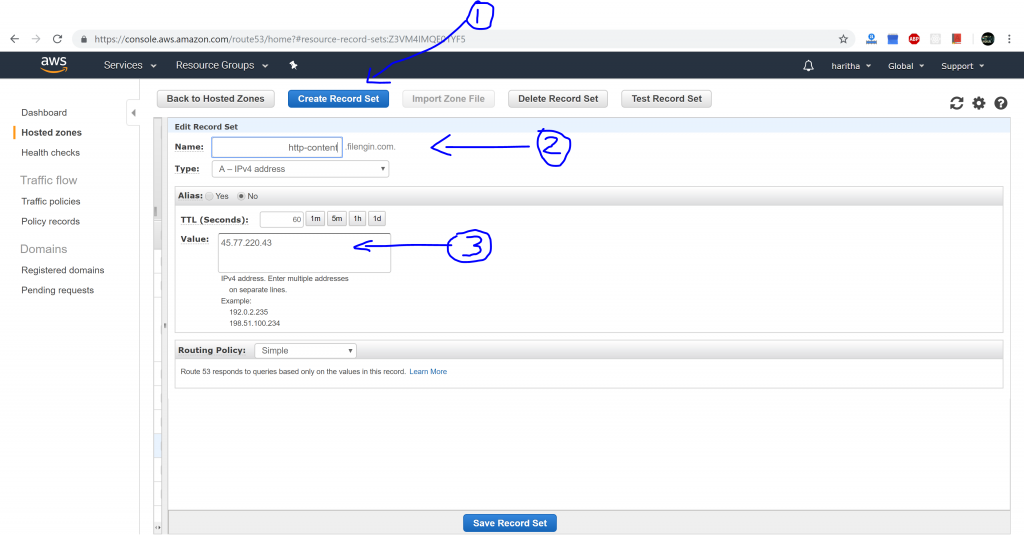
STEP 3. Create a Record Set for your origin server where the AWS make request to get your content
This record is needed for setting up CloudFront properly. Origin server is the server that host your content. Name can be anything, as long as when you entered<whatever>.filengin.com to address bar it should display your website.
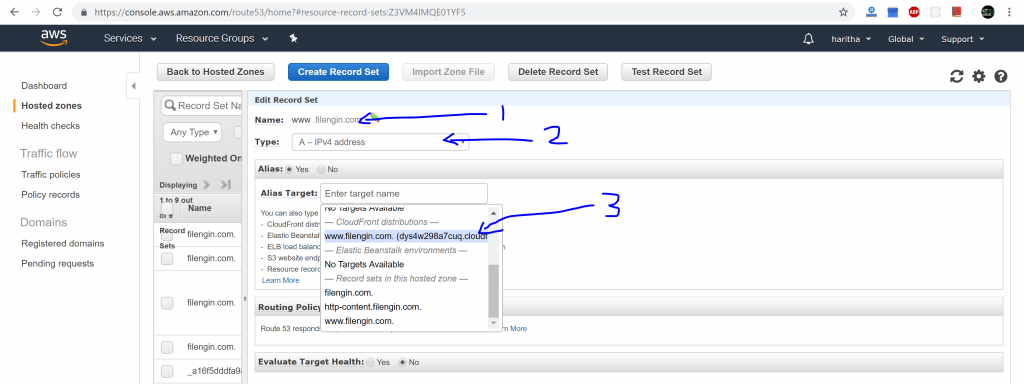
STEP 4. Create 2 Record Set for www, one for IPv4 and one for IPv6 that points to your CloudFront distribution. If you don’t use IPv6 then only for IPv4
I know, you still don’t have CloudFront distribution. Step 8 describes how to do that, for now just pretend that you have one. If you are reading this while creating the actual setup, then I recommend you jump to step 8 and finish that first.
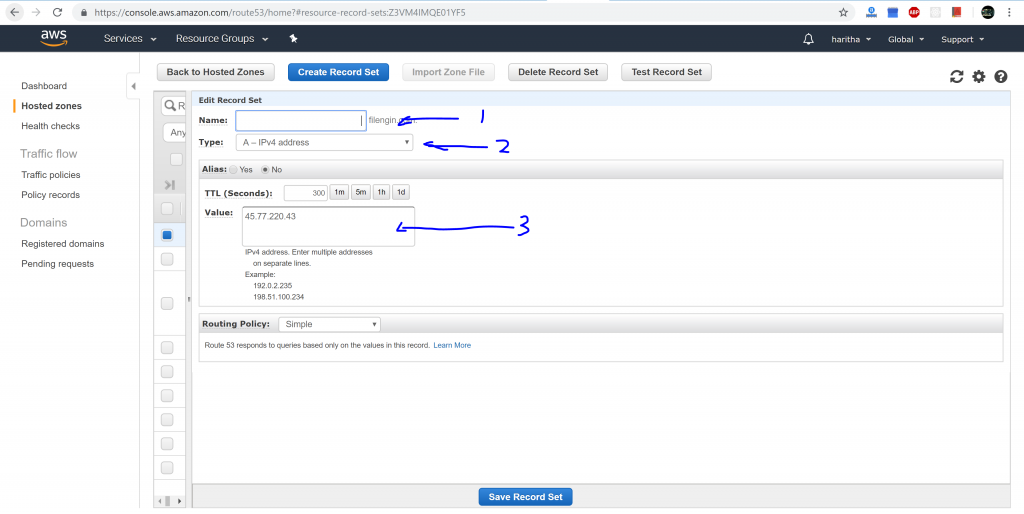
STEP 5. Create a 2 Record Set for non-www, one for IPv4 and one for IPv6 that points to your server. IPv6 is optional.
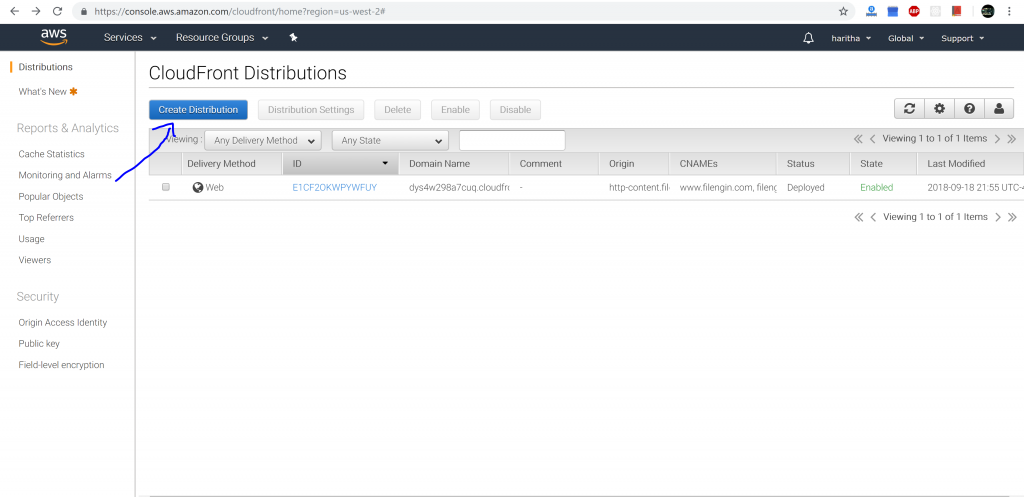
STEP 6. Create a CloudFront Distribution on Amazon AWS
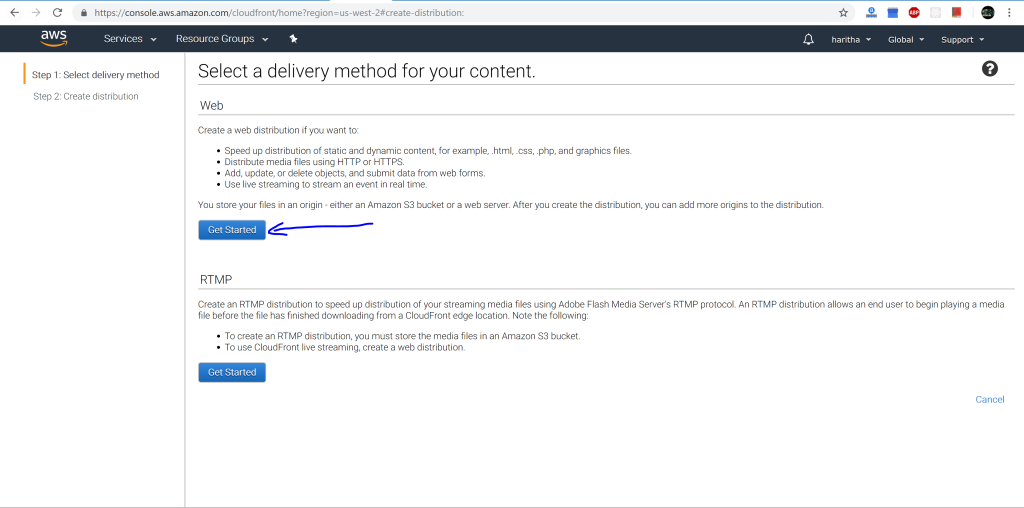
STEP 7. Select Web for delivery method
Setting Up Amazon AWS CloudFront
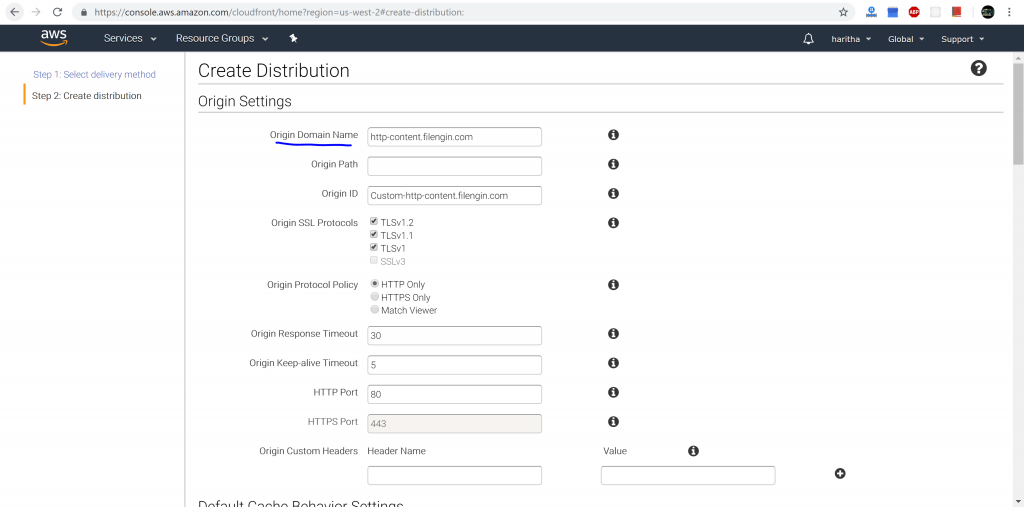
STEP 8. Choose the domain from which the CloudFront request content. This is where your files are hosted.
As I mentioned above, this is the origin servers address. This is where AWS CloudFront feed its CDN with your content.
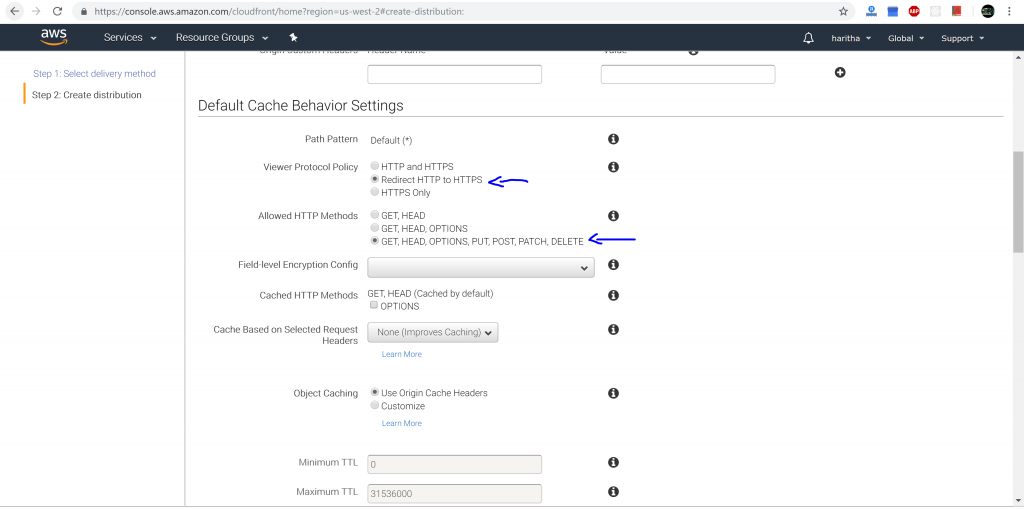
STEP 9. Choose what to do when HTTP request comes and allowed methods
Choose “Redirect HTTP to HTTPS” as it is a good SEO practice.
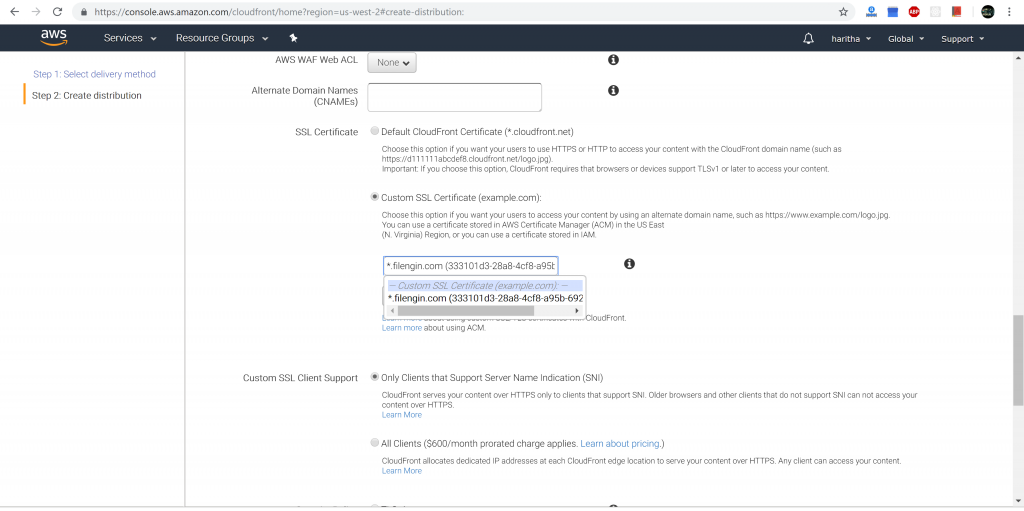
STEP 10. Choose a SSL certificated to use when HTTPS is used to communicate between client (your website users) and CloudFront
If “Custom SSL Certificate (example.com):” us grayed out, you need to create a certificated and validate it. This is a pretty easy step but you need to wait. Please checkout Amazon ACM for more details. If you are already logged in to your amazon console, then visit ACM page.
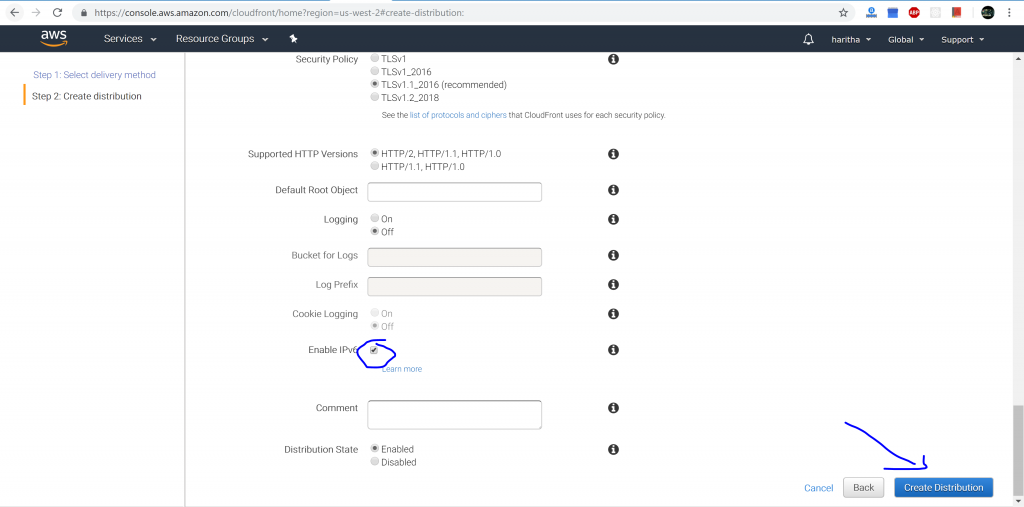
STEP 11. Enable IPv6 (optionally) and create the Amazon CloudFront Distribution
STEP 12. Make sure you have a redirection for both http and https of non-www domain to www on your web server. I use Nginx as my web server. Following is what I have
server {
    server_name filengin.com;
    listen [::]:80; # IPv6
    listen 80; #
    listen [::]:443 ssl; # IPv6
    listen 443 ssl;
    # My certificate information ( Generated by LetsEncrypt )
    ssl_certificate /etc/letsencrypt/live/filengin.com/fullchain.pem; # managed by Certbot
    ssl_certificate_key /etc/letsencrypt/live/filengin.com/privkey.pem; # managed by Certbot
    include /etc/letsencrypt/options-ssl-nginx.conf; # managed by Certbot
    ssl_dhparam /etc/letsencrypt/ssl-dhparams.pem; # managed by Certbot
    # Here I redirect all of the traffic, http or https,
    # coming to filengin.com, to www.filengin.com
    return 301 $scheme://www.filengin.com$request_uri;
}
Above code is simple code block to redirect any request that comes to filengin from port 80 and 433 to www.filengin.com. Notice here that if I replace “`$scheme://www.filengin.com$request_uri;“` with “`https://www.filengin.com$request_uri;“` then it would be more efficient. As you will see in bellow cURL request when someone access to http://filengin.com, it take two 301 redirects to reach https://filengin.com
That’s all folks. If you just changed your DNS to Route 53, then you might have to wait for few hours to see the change. It usually only takes few minutes. You can use following commands to verify that your redirects are working properly:
C:\Users\windows>curl -I http://filengin.com
HTTP/1.1 301 Moved Permanently
Server: nginx/1.15.2
Date: Thu, 20 Sep 2018 02:38:25 GMT
Content-Type: text/html
Content-Length: 185
Connection: keep-alive
Location: http://www.filengin.com/
C:\Users\windows>curl -I https://filengin.com
HTTP/1.1 301 Moved Permanently
Server: nginx/1.15.2
Date: Thu, 20 Sep 2018 02:38:50 GMT
Content-Type: text/html
Content-Length: 185
Connection: keep-alive
Location: https://www.filengin.com/
C:\Users\windows>curl -I www.filengin.com
HTTP/1.1 301 Moved Permanently
Server: CloudFront
Date: Thu, 20 Sep 2018 02:38:58 GMT
Content-Type: text/html
Content-Length: 183
Connection: keep-alive
Location: https://www.filengin.com/
X-Cache: Redirect from cloudfront
Via: 1.1 b6d436e59d565ae27dc9ecbb1f36a6d8.cloudfront.net (CloudFront)
X-Amz-Cf-Id: CsY78EDy8sQzDJbgzbyT0FUWNAd_GECzROfT-SnaG2lPDYOpcefd5w==
As you may have noticed, all http://filengin.com, https://filengin.com, and http://www.filengin.com all points to https://www.filengin.com. Which is what we wants to do in the first place.

